Continuous delivery with Flux CD
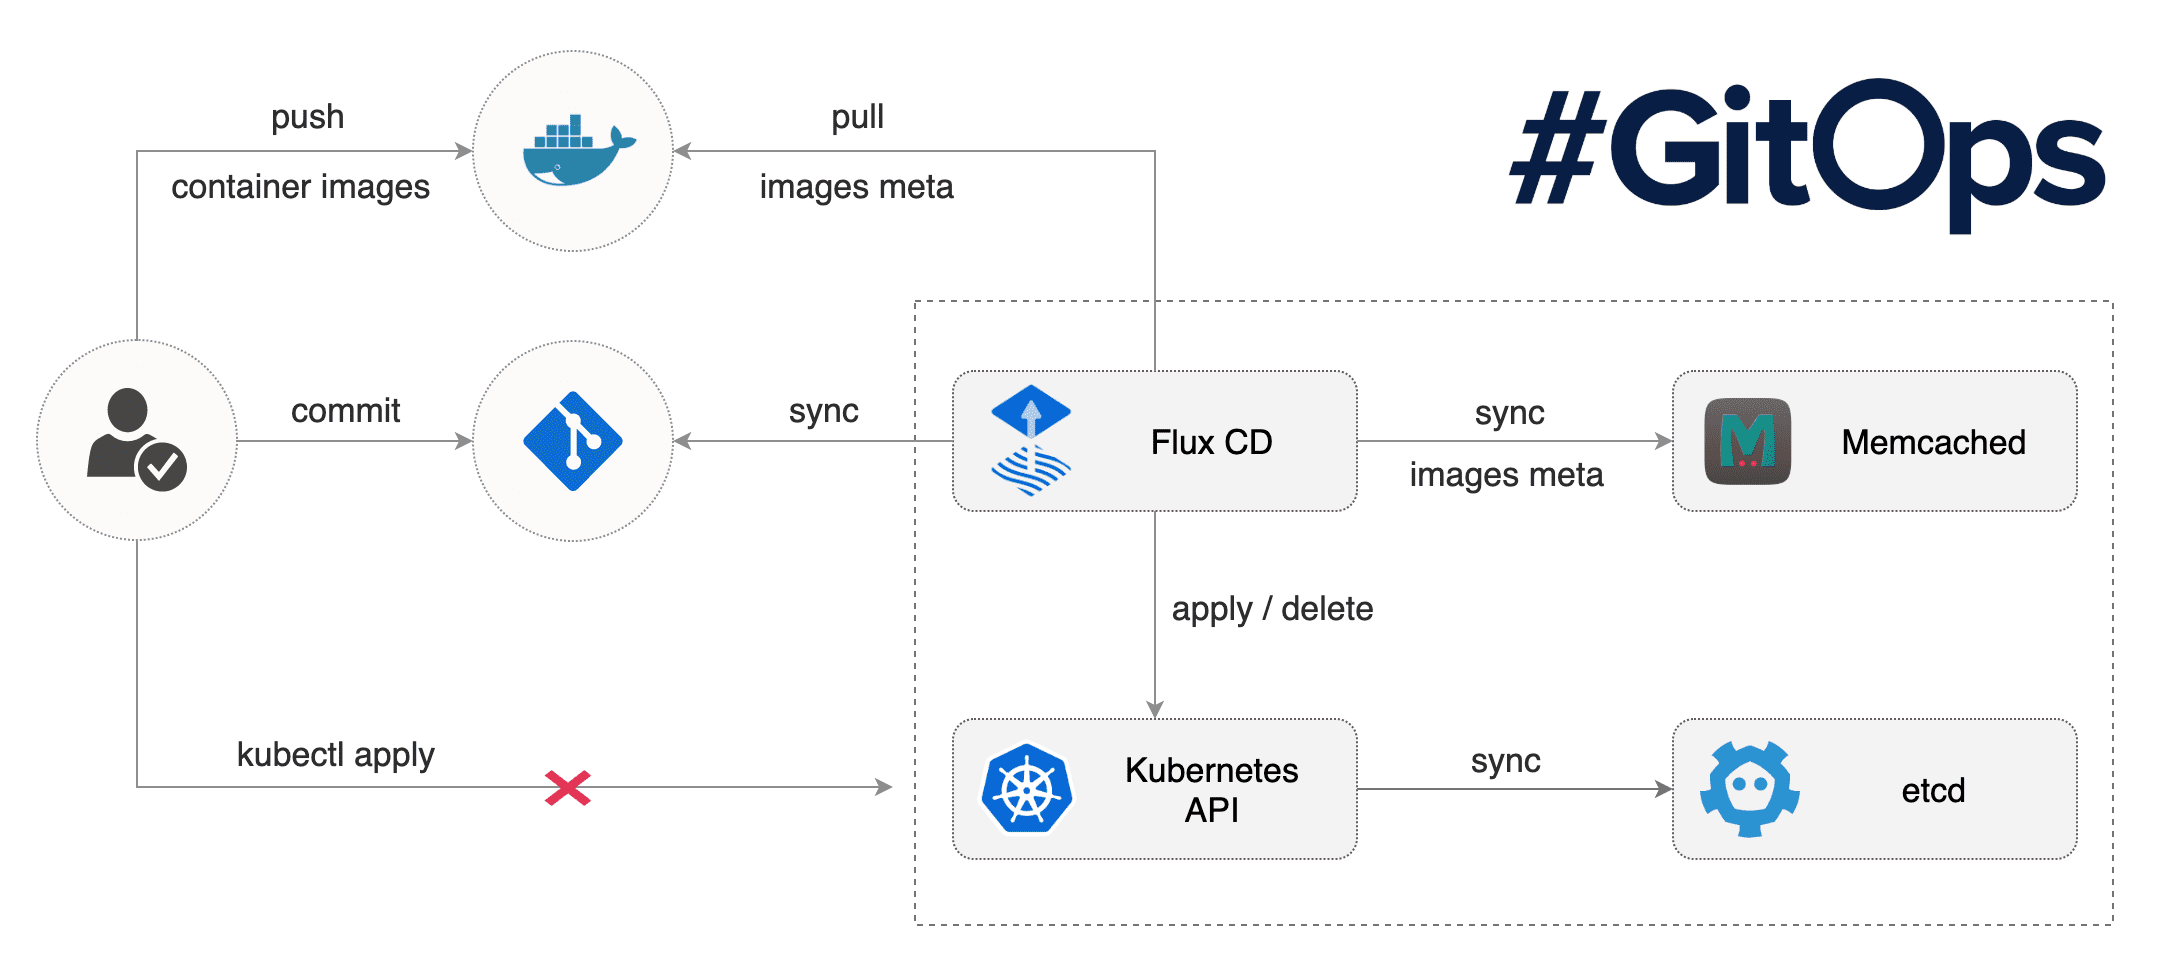
In this Tutorial we try Flux CD with multiple stages and minikube clusters using kustomize.
Prerequisites
Install minikube clusters
We setup two minikube clusters on our local machine named mini-acpt and mini-prod.
minikube start --profile mini-acpt
minikube start --profile mini-prod
Create empty Github repository
Login to your Github account and create an empty repository named flux-multi-stage. Clone the repository to your local machine.
Install flux on minikube clusters
First we install flux on our mini-acpt cluster. Adjust the GHUSER variable and --git-url parameter. With the --git-path parameter we configure flux to only check for manifests under this path in the Github repository. Switch the context to the mini-acpt cluster and create the flux namespace.
kubectx mini-acpt
kubectl create ns flux

export GHUSER="your user"
fluxctl install \
--git-user=${GHUSER} \
--git-email=${GHUSER}@users.noreply.github.com \
--git-path=acpt \
--manifest-generation=true \
--git-url=git@github.com:${GHUSER}/flux-multi-stage \
--namespace=flux | kubectl apply -f -
Now let’s do the same for the mini-prod cluster changing the --git-path parameter to prod.
kubectx mini-prod
kubectl create ns flux

export GHUSER="your user"
fluxctl install \
--git-user=${GHUSER} \
--git-email=${GHUSER}@users.noreply.github.com \
--git-path=prod \
--manifest-generation=true \
--git-url=git@github.com:${GHUSER}/flux-multi-stage \
--namespace=flux | kubectl apply -f -
Now we need to add the deploy key to our Github repository so that flux can communicate with it.
kubectx mini-acpt
fluxctl identity --k8s-fwd-ns flux
Add public key to our Github repository as a deploy key with write permission! Then we need to do the same for the mini-prod cluster.
kubectx mini-prod
fluxctl identity --k8s-fwd-ns flux
Add a namespace to the clusters
Go to your cloned repository flux-multi-stage. Add the file .flux.yaml to the root with the following content:
version: 1
patchUpdated:
  generators:
    - command: kustomize build .
patchFile: flux-patch.yaml
Add the following three directories to the root of the repository base, acpt, prod.
Change to the base directory. Create the file demo-ns.yaml in it with the following content:
apiVersion: v1
kind: Namespace
metadata:
  labels:
    name: demo
  name: demo
In the same base directory create a new file kustomization.yaml with the following content:
apiVersion: kustomize.config.k8s.io/v1beta1
kind: Kustomization
resources:
- demo-ns.yaml
Then create in the prod and acpt directory a new file named kustomization.yaml with the following content:
apiVersion: kustomize.config.k8s.io/v1beta1
kind: Kustomization
bases:
- ../base/
Our repository now should look like:
.
├── acpt
│   └── kustomization.yaml
├── base
│   ├── demo-ns.yaml
│   └── kustomization.yaml
├── .flux.yaml
├── LICENSE
├── prod
│   └── kustomization.yaml
└── README.md
Commit and push everything. Flux syncs the repository every 5 minutes. After that we should find our demo namespace created in both clusters.
Go and list the namespaces in our clusters.
kubectx mini-acpt
kubectl get ns

kubectx mini-prod
kubectl get ns
The output should be like this:
kubectl get ns
NAME                   STATUS   AGE
default                Active   4h17m
demo                   Active   5m13s
flux                   Active   53m
kube-node-lease        Active   4h17m
kube-public            Active   4h17m
kube-system            Active   4h17m
kubernetes-dashboard   Active   52m
As shown above the demo namespace got created.
Add a pod to the clusters
Add a new file to the base directory named nginx-dep.yaml with the following content:
apiVersion: apps/v1
kind: Deployment
metadata:
  labels:
    app: nginx
  name: nginx
  namespace: demo
spec:
  replicas: 1
  selector:
    matchLabels:
      app: nginx
template:
  metadata:
    labels:
      app: nginx
  spec:
    containers:
    - image: nginx
      name: nginx
Edit the kustomization.yaml and add the new deployment:
apiVersion: kustomize.config.k8s.io/v1beta1
kind: Kustomization
resources:
- demo-ns.yaml
- nginx-dep.yaml
Change to the acpt directory and add a file named flux-patch.yaml with the following content:
apiVersion: apps/v1
kind: Deployment
metadata:
  labels:
    app: nginx
  annotations:
    flux.weave.works/automated: "true"
  name: nginx
  namespace: demo
The above annotation will deploy new images automatically.
Change to the prod directory and add a file named flux-patch.yaml with the following content:
apiVersion: apps/v1
kind: Deployment
metadata:
  labels:
    app: nginx
  annotations:
    flux.weave.works/automated: "false"
  name: nginx
  namespace: demo
With the above annotation we prevent autmatic image updates in production.
In the prod directory add a new file named nginx-dep.yaml wit the following content:
apiVersion: apps/v1
kind: Deployment
metadata:
  labels:
    app: nginx
  name: nginx
  namespace: demo
spec:
  replicas: 2
With this kustomization we scale the nginx to 2 in production. Edit the kustomization.yam to add the file above:
apiVersion: kustomize.config.k8s.io/v1beta1
kind: Kustomization
bases:
- ../base/
patchesStrategicMerge:
- nginx-dep.yaml
Commit and push everything. Flux syncs the repository every 5 minutes. After that we should find in acpt one nginx pod running and in prod two pod’s.
Example:
kubectl -n demo get pods
NAME                     READY   STATUS    RESTARTS   AGE
nginx-57b5958569-f4znb   1/1     Running   0          16m
nginx-57b5958569-ngktd   1/1     Running   0          16m
Stop the clusters
To stop the clusters enter
minikube stop --profile mini-prod
minikube stop --profile mini-acpt
Summary
In this tutorial we setup two clusters, installed Flux CD on them and deployed some workload.